There are a few ways to tweak your home office setup to make it great! Here, you will learn how to add additional monitors to your setup.
Multiple Monitors
If you have a personal monitor at home, and would like to project your laptop screen to it, the first step is having the right cords.
Cords
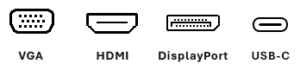
If you have a DHS laptop, you will likely have two ports you can use. On the right side (about even with the Backspace key), there is an HDMI port. For this, you would need an HDMI cable. This is the same as a TV cord, so if you have an extra one of these lying around, grab it and use it!
If you are using a puck with various ports, you may be able to use an additional monitor. Plug the puck in to your laptop using the USB-C port on the right side of the computer, even with the Enter key. You then have access to any port on the puck. There are three display ports available here: the HDMI port, as described above, followed by a VGA port, then a DisplayPort. Older monitors may take a VGA cable, but most will take an HDMI. Keep in mind that you can only use one of the puck’s display ports at a time. You can use the HDMI port that is built in to the laptop and one of the previously mentioned display ports in the puck to have two additional monitors at the same time.
Monitor settings
Once you have a second (or third) monitor plugged in, the next step is to update your settings. This will allow you to have different programs open on different monitors.
- On that desktop, in a blank area of the screen right-click with your mouse.
- Select Display Settings. You will get this:
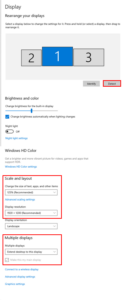
- After the monitor(s) is plugged in, click the “Detect” button. This should detect any additional monitors you have plugged in and display the correct number of screens in the box above that button. Each display should be numbered with your main display highlighted in blue with the number 1. For the one that is highlighted, under “Scale and layout”, “Change the size of text, apps, and other items”, make sure it is on the choice that says “recommended”. Also check the “Display resolution” box for the “Recommended” setting. Click each monitor in the top box and check the same settings.
- Then look at the Multiple Displays drop down box. You want to select Extend Desktop to the Display.
- Next decide which monitor you want to use as your main display. This will likely be your extra monitor rather than your laptop (since it will likely be larger). If so, while you have that monitor selected/highlighted, also check the box that says Make This My Main Display.
Now you will be able to drag anything you are working on from here to there or anywhere. They will work just like your dual monitors at the office.
Cursor movement
Sometimes when you first set up an additional monitor, when you move your cursor to the monitor to the left, your cursor goes to the monitor on the right. There is an easy fix for this.
Remember in steps 1 and 2, you right clicked on the desktop, chose Display Settings and you got the pics of the monitors. If you are having the left-right cursor problem, you can simply drag your monitors around within that little window to put them in a different order.
If you aren’t sure which is which, you can also use the option to Identify. This option will put a giant numeral on each screen to tell you which one is which in the pic. So, if #2 needs to be to the left of #1, just right click on #2 and drag that pic over to the left of pic #1.
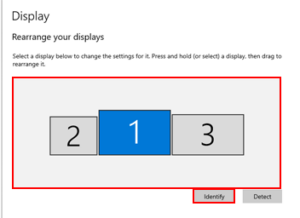
Now test your cursor again. Your mouse should now move properly.
For additional information on ports, go to HDMI vs. Display Port: Which Should I Use for My PC Monitor?